
 Basic UsageHeartThoraxTMPLeadsToolsFocusPreferencesCase FilesVersionsDownload case filesUpdate ECGSIMPublicationsLicense terms
Heart
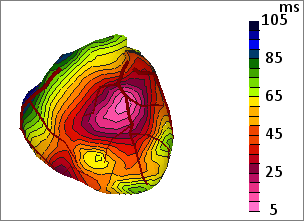
The heart view is used to display the geometry of the heart (either atria or
ventricles) as well as a wide range of functions on its surface.
To facilitate the correct interpretation of the ventricles' orientation, the left
artery descending (LAD), right coronary artery (RCA) and the left circumflex
(LCx) may be brought into view. The displayed surface function may be changed by
various editing tools (see mouse actions).
Examples of such actions are changing the parameters of the local transmembrane potential
(TMP) in the area around the selected node indicated by the
white circles in the figure below, or defining the status of the node to be that of a
focus from which an activation starts.

The image shown in the heart view may be copied to the
clipboard by selecting -Copy- from the
main menu item -Edit- and then choose -Heart-, or by pressing
<Ctrl>-C; while the mouse is within the heart view.
You may use the movie option to view the development in time of the activation of the heart as a movie.
For choosing a preferred color scale see preferences.
Mouse actions
Rotate / Cross plane
The orientation of the heart will be changed when pressing the right mouse button and moving the mouse. You may easily return to the standard AP view by double clicking the left or right mouse button.
The heart will be made "transparent" by pressing the
<Shift> key and moving the scroll wheel back and forth, thus generating
a planar cut through the myocardium and removing the part facing the viewpoint (right
panel in the figure above).
The cross plane may also be moved by the arrow up and arrow down keys
in combination with the <Shift> key. The arrow keys only work after the
heart view has obtained the "focus" by a mouse click in the heart view.
The plane of intersection is initially set parallel to the plane of the screen. This will
change when the heart is rotated, followed by a <Shift> double mouse click left
or right.
Select 
A node at the heart surface is selected by a left mouse button click, i.e. the node nearest to the "clicked position" is selected, as shown by a grey spot on the surface (left panel of the figure above). In default mode, single adaptation, only one node can be selected at a time; if you select another node, the previous one will be deselected.
There are different manners in which the area around the node selected may be combined with previously selected locations (see adding changes).
In the TMP view the transmembrane potential of the selected node is displayed. The range of the zone in which adaptations will be performed is indicated by nested contours at 10 mm inter-distances (see radius).
Radius 
The radius of the zone of a selected node can be moved towards the center and away from it. The radius can be changed by:
- changing the left mouse button function to radius and then drag the mouse while pressing the left mouse button,
- by using the scroll wheel or
- by using the arrow up and arrow down keys. To obtain the keyboard input the heart view needs to have the focus, obtained by a mouse click in the heart view.
Every wheel click or arrow key press changes the radius by 2 mm. The selected zone is indicated by a contour at the selected radius around the center. Additionally every 10 mm an extra contour around the center is drawn.
The transition from adapted to non-adapted values outside the selected zone is performed by the transition zone function, see transition zone.
Probe 
The probe is used to show the transmembrane potential at the selected position in the TMP view or, if selected, the sensitivity map of the selected node displayed in the thorax pane.
Foci edit 
When in foci edit mode the foci edit view will popup. In this mode a node selected on the heart surface can be asigned to represent an early break through of depolarization, or an ectopic focus in the event of a single activation site.
Surface functions
Atria  or
ventricles
or
ventricles 
For some case files both the atria and ventricles are available. The source (atria/ventricles)
will be changed by a click on the corresponding (menu) button. This button will only be shown when the
case file contains both atrial and ventricular data.
Switching from atria to ventricles or back will also change the TMP view.

Initial  or
adapted
or
adapted  values
For both atria and ventricles the initial or the adapted parameter values can be shown. To display the initial parameter values press the menu button on the right. In case the initial values are shown no left mouse button action will be available for the heart view.
Functions
On the surface of the heart model several functions can be used to show information.
Is used to show the depolarization times on the heart and can be used to visualize changes to the depolarization in the TMP view. Is used to show the repolarization times on the heart and can be used to visualize changes to the repolarization in the TMP view. Is used to show the activation recovery interval (ARI). (This option gives no extra information in the movie mode.) Is used to show the TMP amplitude on the heart and can be used to visualize changes to the amplitude of the waveform shown in the TMP view. (This option gives no extra information in the movie mode.) Is used to show the TMP resting potential on the heart and can be used to visualize changes to the resting potential of the waveform shown in the TMP view. (This option gives no extra information in the movie mode.) Is used to show the TMP at a selected time (see leads) on the heart. Is used to just show the geometry of the heart with all its nodes. It can be used to see where the nodes that can be selected are positioned. (This option gives no extra information in the movie mode.) Is used to show the heart contribution to a selected point on the thorax. The heart contribution can only be shown when a node is selected on the thorax. In case no thorax node is selected no surface function is displayed on the heart. A notification is also given in the statusbar. (This option gives no extra information in the movie mode.) Is used to show the potential field strength on the heart.
Transmural / endocardial or epicardial surface
With these options you can change the way a selected node on the heart is handled.

With this option the current selected node is changed from being selected endocardial to the corresponding epicardial node and vice versa. 

With this option the current selected node can be switched to being treated as being transmural or not.
Cummulation mode
With these options you can change the behaviour of what happens when
selecting nodes on the heart and changing
their waveforms.
This function has three options:
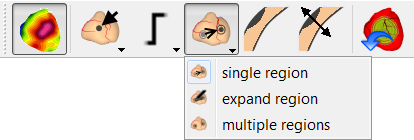
| Select a area and use the previously adapted settings to this new selected area. In the previously selected area the adapted parameters are reset to their initial value. | |
| Expand the area with the new selected node and use the previously adapted setting to this new selected area. New changes to the settings will be applied to the whole area. | |
| Adapt the parameters per selected region. None of the parameters are reset. |
Show/hide heart vector
With this menu option the path of the heart vector can be shown or hidden. If shown, the path
will be drawn through the heart. The resulting vector belonging to the current selected
time (see leads) is shown as an arrow. In
movie mode the arrow traverses over the path.
When this option is being selected, the thorax vector will also be shown in the
thorax pane. In this mode no other view surface functions will be
available in this heart pane and thorax pane
untill this option is disabled.

Color scale
The scale of time and amplitude functions adapt automatically to changes in the function values. Adjustment by the user is not possible.
Show/hide electrodes
The electrode positions of the selected lead system (see leads) can be made visible as grey patches. This is done by selecting -show electrodes- in the -options- main menu item, or toggle the corresponding button in the toolbar. This option will enable the visibility of the electrode positions in both this pane and the thorax pane.